A Place for Divalicious Inspiration!

Sunday, July 31, 2011

Challenge: Faithbooking - Freedom!!

Vanessa here Divas!!!

In light of it being July... my thoughts automatically went to FREEDOM!

It means so much to me, in so many different areas of my life.

I am free because of the Blood of Jesus Christ.

I am free because men and women have lost their lives.

I continue to be free because my son loves his country and is serving in Afghanistan.

So my layout challenge for you, is to create a layout that expresses what FREEDOM means to you!

Here is my layout:


How about you?  How you interpretate Freedom in your life?

Link your project using the Mr Linky widget for a chance to win a prize!


Mister Linky's Magical Widgets -- Thumb-Linky widget will appear right here!
This preview will disappear when the widget is displayed on your site.
For best results, use HTML mode to edit this section of the post.

Saturday, July 30, 2011

Saturday Diva Snaps!!!

This weeks challenge was a photo scavenger hunt. I want to thank the three divas who participated! It was great to see their wonderful photos and how creative they are in what they posted!

Diva snaps go to Janice @ My Stories Told Through Pictures,   Here are a couple of her pics...

Cute flower embellishments
 Love the bed spread, lol!
 Cute card fold!
Thanks again Janice for playing along.  Send me your addy at Cleosan52 at yahoo dot com for your prize before next Saturday!

And don't forget divas, leave any projects links that you do in the week so we can showcase them on Saturday. Hint, hint!!! I'm thinking all our showcased blogs will be in the running for a rak!!!!  So far we have two.

Friday, July 29, 2011

Tutorial Friday - Rossete Flower!!!

Hello Divas, It's me... Luisa saying hi and sharing this easy and great tutorial with you!

Rossette flowers or Medallions are a popular trend right now and I thought it will be nice if we all Divas learn how to do them.
They are quite easy, requires little materials (and we got them already), they are gorgeous and they add lots of "Diva flair" to any card, layout or altered project.

Here we go...

Materials needed:
- Scoring board or paper trimmer
- Bone Folder
- Circle punch (3/4 of the size of your rosette flower)
- 12" strip of cardstock by 1", 1.5", 2" or bigger depending on the size of the rossete you want to create!


- Adhesive!


I strongly remommend you use any kind of strong Glue Dots for this project.  Liquid glue is ok, but it takes more time to dry and the rossette can unfold while it's drying!

THE PROCESS:

1) Cut your cardstock strip to desire width and score every 1/2" on the horizontal side.


2) Accordion fold your scored cardstock.


3) Glue the ends of the folded strip of cardstock and form your rossette.  Chances are that it will unfold, it's ok!

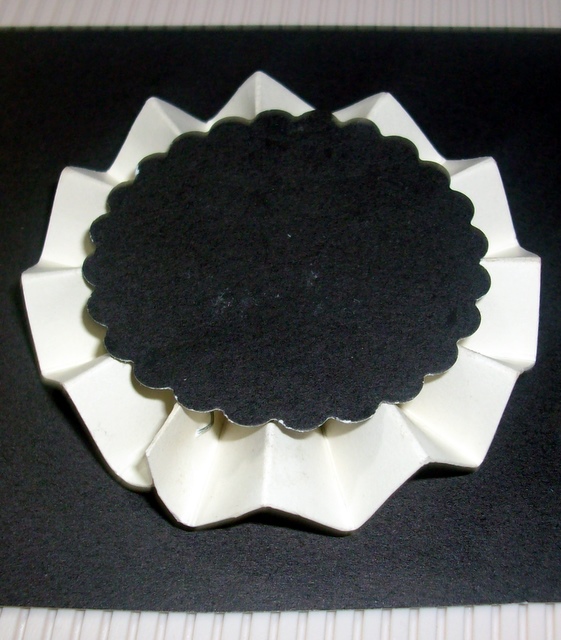
4) Punch a circle for the back.  I recommend you cut this from cardstock!  Add glue dots and adhere to the back of the rossette.  If you are using liquid adhesive, you will need something a little heavy to put on top of your rossette to help set, while glue is drying!  I put my circle punch on top of it to help maintain the rossette shape.


Here is how the back would look!


5) Nos it's time to embellish the front.  I cut an scallop circle from pattern paper 3/4 of the size of the rossette for the front base.


And I punch another 1" circle to place it beneath the button.  I add some hemp to the button to add more flair.


Voila! Your rossette is ready!

Here is a layout I did were I incorporated a rossette flower:


And here is a close-up of my first rossette!


Hope you like todays tutorial.  If you create a rossette for any project or if you have projects with rossette flowers please share with us...

Hugs and blessings your way!


Thursday, July 28, 2011

Book Of Me, Part 1

 Well, hello. Pammie Kay here.  This post is going to be about starting or continuing a Book of Me.  Let me start by saying there is no right way or wrong way...just YOUR way.  Some ideas are a traditional album, a 3-ring binder, or even a mini album.  I usually jump around with my life, but that is because I do subjects as I find a picture buried in my mom's treasures!
   I think the most important reason for a BOM is to record your life. Ever look at a picture of an ancestor and wonder, "how did they come to America?" I do. We all have forgotten stories in our families.  Since we are always behind the camera as moms, our story is getting lost.  To look at photos, a stranger would think my children didn't have a parent! 
    So Angie Pederson who writes several great books about journaling. She even has a book of me book. She also gives us some great pointers in her blog (click here to read more or follow Angie, as I do!) 
"If this were an event in your grandmother’s life, what would you want to know from her? What thoughts would you want her to jot down about an experience in her life?" What an awesome prompt is that? Your Grand kids will wonder the same thing.
    In the space, we will look at different ways to express ourselves, through writing, painting, art & pictures.  I love seeing what you are doing, so I will be asking to see our layouts...even offer a monthly prize for a random participant every month!


   Here are some samples of some I have made in the past...I added lots of journaling in the first one, and not as much in the second set. But the paper behind my picture is a copy (on acid free paper!) of one of my homework pages from 2nd grade!)
   So, here's comes a challenge for you...Where did you grow up?  I'm going to start on mine tonight. All layouts are due by Wednesday, August 10, at 5:pm CST.  I'll announce the winner in my post on Thursday.   Be sure and upload your URL to Mr. Linky or you can respond in the BOM group on our Facebook page. (I think I have to invite you to join, so ask me on the FB page)

Can't wait to see what you create!

Wednesday, July 27, 2011

Sew Simple Techniques!

Happy Wednesday everyone!

One of my favorite embellishments to add to a layout is sewing, but although my mom & my sisters sew, I do not. What's a girl to do when so many of my favorite projects feature sewing? Today I'm sharing with you a few ways to get the look without having to pull out the sewing machine!


First & foremost, I'll admit that I do own a sewing machine, and from time to time I'll use it for my layouts.
See? Love the look.

However, changing the threads and bobbins,

figuring out the tension and stitch length, etc.

are still challenging for me,

so I'm happy to have some alternatives!

Option 1 involves using a new tool, (for me anyway!) the Sew Easy Stitch Piercer & mat by We R Memory Keepers. This tool pierces your paper in a straight line or pattern so that you can easily hand stitch your colored thread of choice.


How it works:


Decide where you want your threaded line to go. Lay your paper across the pink mat. Take your stitch tool & insert the head with the desired pattern. Roll the piercer across the paper, perforating the paper. Once that's done, thread your needle with embroidery thread. ( TIP: embroidery thread is thick, so separate 2-3 strands of thread from the main strand so it'll go through the holes easier. We R also sells twine & thread specifically for this tool, but I just used emb. thread from my local craft store.) Now just hand stitch your design! If you'd like to learn more about this tool, just click here. You'll also find tutorial videos and a downloadable Adobe document of tips & pics.

Even easier is option 2: Border punches!

Border punches are tools that most crafters already have in their stash, so let's put them to work! All you have to do is punch your border, & depending on the size of your holes, thread them with embroidery thread or ribbon. Building on their Sew Easy success, We R Memory Keepers has now come out with the Sew Ribbon crafting tools, which will basically do what I've just described. Find it here.


Hope you've found an inspiring new technique to add some flair to your paper projects today! Let us know how you use it!


Happy Crafting~


Stephanie


Tuesday, July 26, 2011

Cookbooking: Recipe Cards


Alecia here...
Tired of the same old look of the 4x6 recipe card? Then create your own, and customize the size! For example, see the shapes and colors of the recipe cards on my layouts below? Not your everyday black and white. If you want a new way to break up the monotony of page design for your heritage cookbooks, try these recipe card styles.


* Jillibean Soup offers smaller recipe cards with some lines, perfect for layouts
* try using journaling tags! jot down the ingredients and add to the mix
* want to document a school lunchbag favorite? try a library card for your recipe!
* recording a perfect birthday cake recipe? use half of a birthday card for your cake

Your cookbooking layouts don't have to feel monotonous. Hope some of these tips inspire you to start or add to your family heritage recipe book today!

*use Thickers to title a homemade cardstock recipe card


*create a recipe card from patterned paper, and hide it within a flap


*use the recipe cut from the packaging! add some zip to your scrapbooks and fess up if you've ever used a manufacture's suggested recipe

Monday, July 25, 2011

2 Tier Serving Tray

This idea was not mine, so credit where credit is due goes to Jeanne's design as well as her mother, Rosemary's take on the project.  I love visiting their blog, Building It On Pennies to see their latest and greatest creations.  There have been so many inspiring ones, that to list them all, would take up the whole page.  So be sure to go over and have a look around.  I am positive that you will see something to suit your fancy and that you will be amazed at the low cost of creating an item or project yourself.

I have been SO EAGER to try this concept out and during my last venture to the Goodwill, I hunted for about 20 minutes for the right items to purchase and use.  I went through all of the dishes available, picking one up, then laying it down.  Then I picked it up again.  I thought to myself, "do I choose all white, then spray paint them all to match?  Do I pick coordinating colors?"  I played with these ideas and then I did the same thing with candlesticks and vases, "Should the center piece be taller, more slender, transparent?"  When choosing your items, be sure to test the structure to be sure the dinner plate will hold the vase/candlestick flush against itself as well as the salad plate resting flat on top. 

My final choices were:
11" Royal Norfolk Dinner Plate (green)........... Cost $1.00
8" Gibson Salad Plate (plum).......................... Cost $0.75

5 1/2" Decorative vase (white) ........................Cost $1.00

I really like this color palette!  :O)  I also love the character the vase has. The opalescent shine and the decorative dimples made the final decision easy.  Not to mention, the total cost being under $3.00!!!!


And I am hoping that the glue I am choosing will be strong enough to last.  I am using Quick Grip as it is an all-purpose adhesive that is water/weather proof and paintable, should the need arise to ever touch up the serving tray.  It also dries Crystal Clear (fingers crossed).  I decided to not use the SureHold adhesive because in order to waterproof, it would require spreading the adhesive over the entire surface of the tray.  Also, it is suggested (on the label) to not place the adhesive on painted surfaces.


So, this is the final project...I would love to read your thoughts!


Sunday, July 24, 2011

Sunday Challenge: Photo scavenger hunt challenge

I thought it would be fun to have a little scavenger hunt this week!

Rules:
  • Go through your home, layouts and cards aka your stash (ie. green marker, it can be an actual marker or a card that you used the marker to embellish)
  • Find the item on the list
  • Take a photo of it
  • Upload to your blog
  • Link your post back to here for a chance to win on Saturday.
Winner will be picked my random.org
  1. Flowers
  2. Ribbons
  3. Food item/Dinner
  4. Glitter
  5. Favorite craft item
  6. A bed
  7. A family member
  8. Your most recent picture that you just took (not including this challenge)
  9. The color green
  10. A card fold ( easel, joy fold, trifold, etc)
Here are mine in order...

    Hope you have fun with this and play along!  Can't wait to see the pics :)
Mister Linky's Magical Widgets -- Thumb-Linky widget will appear right here!
This preview will disappear when the widget is displayed on your site.
For best results, use HTML mode to edit this section of the post.

Saturday, July 23, 2011

Saturday's Diva Snaps

Okay just learned another new thing from a couple of teens at church...  AWESOME SNAPS!!!!
Whta in the world are those????  Well, when someone does something awesome/neat/special/etc., the girls all start snapping their fingers together and say "Snaps to so-and-so".  How cute is that, lol!  I started doing it to my toddlers and they love it when mommy gives them snaps!

I thought this would be perfect for here.  Our divas do some awesome work and snaps should be given all around along with some recognition. 

This week Nancy @ NickleNook shared with us a cardscape that she did back in April and is just perfect for what I was talking about on Thursday's Card post about Cardscapes.

Don't ya just love it!!!!  This is paper piecing at its best, lol!  Thanks for sharing with us Nancy.  You get some AWESOME SNAPS for the week!!!

Another great post is from Lolis @ My Creative Corner.  She did this awesome scene with the barn and cute cow.  How precious is this...
AWESOME SNAPS for the week Lolis, you are so talented!!!!

Please stop by these two Divas' blogs.  Their work is just beautiful, Nancy with her faithbooking and Lolis with her altered media, layouts, gifts, etc.  I just drool over all their pictures!!!


Friday, July 22, 2011

Tip of the Week 7/22

Welcome to our Tip of the Week!

If you're like me, you tend to move your page elements around a gazillion times trying out different layouts and angles before you stick anything down.

Stickers though, are already sticky. So...how do you get around this? I like to adhere my stickers to white cardstock and then trim around edges so the cardstock doesn't show. This allows me to move my stickers anywhere I want on the page without messing anything up!

Happy Crafting!
~ Stephanie

Thursday, July 21, 2011

CardScapes

You've heard of landscapes but have you heard of cardscapes?   Well, I didn't either until I just made up the word, lol!!!!  I'm know to do that from time to time.  Most crafters call it paper piecing but when I stand back and look at a card with die cuts, it looks like a pretty scene to me aka cardscape.

It is very easy to do.  Once you have your main focal point, you then design around it.  Here I did a paperdoll, add an umbrella, cloud and a couple of rain drops and I got my "rainy day" scene.

In this one, I wanted a princess.  Add a castle, a little path... and I got my "fairy tale" scene.
This is my favorite.  I showed it in the Xmas blog hop.  I added a tree, deer, star and snow background and got my "winter scene".

Its all in the background!  Hope you like them :)  If you've done a "cardscape" before, we would love to see it.  All you have to do is leave a comment with the link to your blog and we'll come visit :)